

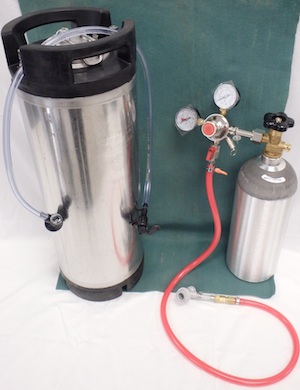
Home Brewing Keg Systems w/ Used Corny Keg ($250.00)
Tired of bottling yet? Too much cleaning, too much space, too many empties? There is a solution. Kegging!!! We've all seen the 15 gallon kegs typically used by bars and the occasional frat party. Well, home brewers have their own spin on kegs. We use 5 gallon stainless steel tanks, originally designed for soda fountains. The size is convenient since it matches our batch. The tanks are cylindrical in shape and fit well in a spare fridge. Here's what you need.
1. Double Gauge Regulator: Controls the amount of gas used to carbonate and dispense your beer. Includes a gate valve to turn on and off easily. $55.00
2. Beer Line/Coupler/Faucet Tap: Attaches to the keg and dispenses beer under pressure. $15.00
3. CO2 Tanks: Holds liquid Carbon Dioxide under high pressure (875 psi in a 5 lb bottle). $100.00
4. Gas Line/Check Valve/Coupler: The line sends gas to the keg, the check valve prevents beer from back flowing to the regulator, and the coupler allows quick release to the keg. $20.00
5. Keg: Stainless steel tank with a removable lid. Holds beer under pressure to retain carbonation. Has self-closing in and out fittings for quick release couplers. New $130.00, Used $70.00
How to use the Keg System:
1. It's easy. Siphon your beer from the fermenter into the Keg. You don't need to add sugar for carbonation.
2. The keg lid is held in place with a clamp similar to swing top bottles (Grolsch style). Attach the lid and clamp shut.
3. Snap on the Gas Line with the Quick-release Coupler. Most kegs have "IN" and "OUT" written by the appropriate connector. Gas is IN. Beer is OUT.
4. The gas line is attached to the Regulator which is attached to the CO2 Tank. Open the CO2 Tank valve, set the Regulator to 30 psi using the knob at the center of the Regulator. This is a valve called a "diaphragm". Turning to the left lowers pressure (psi), turning it rightin, increases pressure.
5. Turn a second valve at the base of the Regulator to the down position. This will release the gas into the line and into the Keg. You will hear a hissing as the gas enters the Keg. You may need to adjust the lid of your Keg now. If it isn't on just right, it may leak gas.
6. Your beer needs to be air free for best results. You can purge the air out of the Keg by pulling up on a "relief valve" attached to the lid. Pull up on the ring for about 5 seconds. This should let air escape as the CO2 takes its place.
7. At 30 psi, the beer will carbonate in about 3 days.
8. After the beer is carbonated, turn the Regulator pressure down to 5 psi. Pull up on the lids' relief valve to release excess pressure.
9. Attach the Beer Line to the Keg using the "OUT" connector fitting. Open the faucet. You know the rest.
Things that make a difference: Your beer will absorb more gas at colder temperatures. To get good carbonation at 30 psi, you want to have your beer in the refrigerator with the gas line attached. On the other hand, the CO2 bottle works best at room temperature. For best results, drill a 1/2" hole in the refrigerator for the gas line to pass through. Leave the CO2 Tank and Regulator on the outside, beer on the inside.
This is just the very basics for using your keg system. If you're interested I can go into more detail about parts and cleaning and enhancing your system to have a variety of kegs (and beer) available at the same time. We can show you how to bottle from the keg, use your CO2 to purge fermenters and start a siphon.
Corny Kegs/Kegerators/Micro Brews
If you are currently using a home keg system, you are familiar with the operation of the CO2 bottle, regulator, tap, and faucet. To make it easier for you, many microbreweries are offering beer in a 5 gallon Cornelius Keg (Corny for short). For years, soda distributors have used these stainless steel tanks to deliver carbonated beverages to restaurants, mini-marts, and wherever soda is sold. Corny kegs are also a wonderful tool for kegging beer. Unlike the standard 8 and 15 gallon kegs, you can purchase a Corny keg for home use. It is easily transportable and easier to tap. Since you purchase your own keg, the brewery will not ask for a deposit or demand the keg returned before a certain date. Corny kegs can be purchased new for about $150.00 or used and reconditioned for $55.00. Both available at your local home-brew store.
Whether new or used, ownership comes with responsibility. Your local microbrewery will happily fill a Corny keg but you will need to clean it before they can fill it. This is no different than the rest of your keg system. All your keg system parts need to be cleaned periodically. It would make sense that every time you empty your keg, you will want to clean it in preparation for the next filling.
If you purchased your keg from Olympic Brewing in Bremerton, they come with a guaranty to hold pressure. The “O”rings have been inspected and/or replaced. The used kegs have been cleaned and reconditioned but will require sanitation. If you are unsure of your kegs heritage reconditioning may be necessary.
Sanitizing Your Keg
All kegs need to be sanitized (not sterilized) before filling. Many sanitizing solutions are available and work well. My first choice is an iodine based sanitizer called Io-Star. It is simple to use and won’t harm stainless steel. To begin, pull up on the gas relief valve on the keg lid to relieve any pressure. Pull back on the lid clamp, push down, turn 90º, and pull up to remove the lid. Fill the keg with 1/2 oz. of Io-Star and 5 gallons of warm water. Find the connector labeled “Out” on the top of the keg. Push down on the valve in the center of the connector. That will allow the sanitizer to fill the outlet tube. Let the keg sit with the sanitizer for 20 minutes. The keg has now been sanitized. Empty the keg by dumping out the sanitizer. Save some of the sanitizing solution to soak your keg lid, hoses, and faucet. When the keg is empty, push down on the “Out” connector valve again to drain the outlet tube, then empty again. If you have a kegerator, you can pressurize the keg, attach the couplers, and flush the faucet and lines. The Io-Star solution does not require rinsing with water. The Iodine solution will evaporate and the keg is ready to be filled.
Beer leaves a deposit on stainless steel kegs, faucets, and fittings called “beer stone”. Once or twice a year, you will want to use a cleanser like PBW or a powder cleaner called Straight A to remove the beer stone. Using the same sanitation methods with these cleansers will keep your equipment safe, sanitary, and most importantly, keep you beer tasting great.
Reconditioning Your Keg
All kegs are assembled from many stainless steel parts and a number of rubber O rings. Most of these parts come into contact with the beer and therefore must be cleaned and sanitized before use. With careful disassembly and assembly, none of the stainless parts should ever need replacement. O rings can eventually dry out, crack, get cut, or simply get lost. One of the real advantages of kegs is the wide availability of standard replacement parts. Olympic Brewing will have all the parts you need.
Keg lids can come in different styles, with or without a pressure relief valve (top). The O rings from reconditioned kegs (shown around the lids) should be thoroughly cleaned or replaced.
Because many home brewers acquire used, reconditioned kegs, and because there's no way of knowing where that used keg came from, it's always a good idea to disassemble used kegs completely and inspect them for damage (such as pitting or rust spots inside), residue, and general cleanliness. The kegs may well need a good scrubbing with Straight-A.
STRAIGHT- A CLEANSER
Cleans with oxygen and does not contain any chlorine, bisulphites, organic compounds or phosphates. Superior wetting power penetrates and lifts soils. Removes labels, dissolves acidic soils. Use 1 tablespoon per gallon of warm water. Caution: keep out of reach of children.
Disassembly and Cleaning
The lid: It should be easy enough to remove the lid and the large O ring used to seal it when the keg is depressurized by lifting the retaining bail (the lid won't budge if the keg's under pressure). Often the O ring will smell strongly of soda syrup. The smell can be removed by washing in warm soapy water. Many brewers prefer to buy an O ring kit to replace all the rubber parts to eliminate the syrup odor. I've never found the original O rings to have any effect on beer aroma or flavor, but the choice is yours. In any case, the O ring should be removed from the lid, and both parts thoroughly washed and reassembled, along with the retaining bail.
The inside: A newly purchased keg should be very clean inside and not require any special treatment. An effective way to wash the interior, if it's needed, is to add about 1-2 tsp of un perfumed dishwasher detergent or TSP to about 2-4 qt of the hottest tap water available. With the lid in place and locked, shake the keg repeatedly, then drain and rinse. Usually, the kegs you buy will have only been used as soda canisters, and any residue they contain is easily water soluble.
Kegs can be harder to clean after you've used them for beer making because of beer stone, protein deposits, trub, and so forth. A standard carboy brush will come in handy for loosening gummy material. The dishwasher detergent will then leave the keg bright. It's sometimes difficult to tell whether the keg is completely rinsed, so after draining all detergent water I rinse three times -- twice with very hot water, and a final time with cold water.
The connector valves: Two valve assemblies, also at the top of the keg, allow the rapid connection and disconnection of the gas pressure line and the beverage dispensing line. These poppet valves are designed so that gas pressure inside the keg seals the valves shut when the keg is not connected during storage and transport. The gas and beverage hoses connect to these valves using "quick-disconnect" fittings. The valves and matching fittings come in either a ball-lock or a pin-lock style, which are just two different ways to couple the fitting to the valve.
Remove. The two valve assemblies thread onto the keg like any nut to a bolt. For ball-lock kegs, use any wrench or socket that matches the fittings (one is usually a standard hex shape, and the other usually a 12-point style), turn them counterclockwise, and remove them from the keg. On pin-lock kegs, the gas-side connector uses two pins 180 degrees apart, and the beer side uses three pins 60 degrees apart. The pins make it difficult to get a wrench on the beer side. Many brewers modify a spark-plug socket wrench by cutting slots in the corners for the pins to fit into, which prevents accidental snapping of the pins off the connector.
The IN and OUT fittings on a ball-lock keg have very slightly different diameters. The mnemonic for connections is Gray = Gas, Black = Beer.
Inspect the O rings: Inspect the exterior O rings for damage, and replace them if they've been cut. They can be removed from the valve housing using a small screwdriver -- be careful not to use too sharp a tool.
Sanitize. Soak the valve assemblies in Io-Star before reassembly.
The gas (IN) fitting of a pin-lock-style keg has two pins; the beer fitting has three. The poppets in these valves allow the keg's gas pressure to seal shut when the keg is not connected.
The beer and gas tubes: After you've removed the valves from each side of the keg, you'll see the two threaded connections integral to the keg. In the hole of each connection you should find a stainless steel tube. The tube on the gas side of the keg, the side marked IN, is only about 2 in. long; the other tube, on the beer side marked OUT, is much longer and reaches to the bottom of the keg. Remove both tubes by simply reaching into the keg and pushing the tubes up and out.
Clean. The top of each tube is flared outward to retain the O ring and to prevent the tube from dropping through the hole into the keg. Carefully remove the O rings (original equipment on many kegs is often a rubber washer), and clean them and the tubes with warm water and detergent. A long tubing brush is handy for thoroughly cleaning the interior.
The pin-lock-style fittings on this keg are not interchangeable with ball-lock connectors. Thus, it's usually best to stick with one style of keg
Reassembly
Reassemble the keg by inserting the long dip tube into the OUT side of the keg and the short tube into the IN side. Thread the valves back on, remembering to put the gas and beverage valves on the correct sides of the keg.
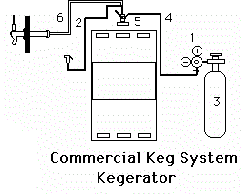
Keg Systems for Commercial Beer
You don't need to home brew to get great kegged beer. Just like the taverns, you can get an 8 or 15 gallon keg for you tapping pleasure. Here's what you need.
1. Double Gauge Regulator: Controls the amount of gas used to dispense your beer. Includes a gate valve to turn on and off easily. $55.00
2. Beer Line/Coupling Nut/Handheld Faucet Tap: Attaches to the keg and dispenses beer under pressure. $11.00
3. CO2 Tanks: Holds liquid Carbon Dioxide under high pressure (875 psi in a 5 lb bottle). $90.00
4. Gas Line/2 Clamps: The line sends gas to the keg Tavern Head. $5.00
5. Tavern Head (Sanke Tap): A coupling device used to open the keg, channel CO2 into the keg, and dispense beer into the beer line. $35.00
6. Chrome Faucet / 3" Stainless Steel Shank (Optional): Professional beer faucet (just like the taverns) connected to a steel pipe. It installs through a 1" hole in your refrigerator door and attaches to your beer line. $40.00
Using Your Commercial Keg System
Different breweries use different keg styles. The most common is strait sided and has a single, ball shaped, opening in the top. This is called a Sanke keg. Unless you choose to get imported beer, your tavern head will work with these. If you do get imported beer we can find taps to match those too.
1. Attach one end of the red gas line to the Tavern Head. Squeeze the hose over the barbed connector and clamp.
2. Attach the other end to the barbed connector of the Regulator and clamp. Now, the gas line is attached to the Regulator which is attached to the CO2 Tank. Open the CO2 Tank valve, set the Regulator to 7 psi using the knob at the center of the Regulator. This is a valve called a "diaphragm". Turning the knob left lowers pressure (psi), turning it right, increases pressure.
3. Screw down the coupling nut of the beer line to the top opening of the Tavern Head.
3a. (optional faucet). If you choose to use the Chrome Faucet, attach it to a drilled hole in your refrigerator door using the back nuts, washers, and flanges included. Attach the coupling nut of your beer line to the back of the shank. You're ready.
4. We are ready to tap the keg. There is a handle on the Tavern Head. Put it in the "up" position. Attach the Tavern Head over the keg opening by pushing down and giving a quarter twist. This will secure the Tavern Head. To release the beer, pull back on the Tavern Head handle to unlock it and push down.
5. Turn a valve at the base of the Regulator to the down position. This will release the gas into the line and into the Keg. You will hear a hissing as the gas enters the Keg. The 7 pounds of pressure is pushing out your beer and keeps it carbonated. If your beer is foamy, adjust the gas to 5 psi. If the beer is warm it will be foamy as well.